
The camera is a fascinating tool. It’s amazing how a camera can freeze a moment in the present and lets you savour it in the future. While it may seem pretty straightforward what a camera does, quite a lot happens inside the camera when you press the shutter release button to capture a photograph. When you are capturing an image, you are essentially making an exposure on the sensor using settings for aperture, shutter speed and ISO. The rule of equivalent exposure, in simplest terms, allows you to make the exact same (or let’s say, equivalent) exposure using different settings for aperture, shutter speed and ISO. The rule of equivalent exposure perfectly complements the Sunny 16 Rule.
To get a better understanding of the topic, it would be wise to take a look at how a camera functions and how an exposure is made. Feel free to jump to the last section to get straight to the rule of equivalent exposure.
How a Camera Records Images
There are different kinds of cameras out there – DSLR, mirrorless, film, or the camera in your phone, for that matter. While they may differ in the technology they use, the principles of image-capturing is the same. A DSLR camera may be substantially different from the other types of cameras in its construction as it consists of a reflex mirror that allows it to feature a through-the-lens optical viewfinder. It doesn’t matter what type of camera it is, the process is fundamentally the same. At the heart of your photography lies the image sensor (or a film, as the case may be). It’s where the photographs are created.
Light from your subject enters the lens, passes through an opening/hole (called aperture), hits the sensor and gets recorded for a fixed duration (called shutter speed) on the sensor that has a specific responsiveness or sensitivity (called ISO). This is, more or less, the sequence of events that occurs when you press the shutter release button and after which you have captured an image, or let’s say – made an exposure. These three settings – aperture, shutter speed and ISO speed, constitute what is called as exposure triangle.
In most cameras, you can choose the value for each of the three settings before making an exposure. You can claim to have made a good exposure if the image seems acceptably bright and without any clipping in the shadows or the highlights (pixels are 100% black or 100% white as indicated by being pushed up against the left or the right of your histogram). The most commonly available values for each of the three settings are listed in the table below (the list is not exhaustive, of course).
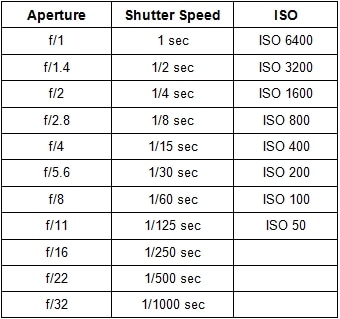
typical exposure settings
Stops: What is it?
In photography, the term ‘stop’ represents a relative change in the brightness of light. For instance, if you start with a single bulb and add another bulb, the light intensity will have increased by one stop. One stop represents the doubling or halving of light. Taking the example further, if you added two more bulbs (i.e. four bulbs in total now), the light intensity increases by another stop. But it has changed by two stops in total. I think you get it now.
Likewise, light intensity can be changed when an exposure is made inside the camera. It can be accomplished by changing the aperture, shutter speed or the ISO. Consider a photograph with these exposure settings for a well exposed image – f/8 and 1/125 sec at ISO 100. If you change the aperture to f/11, you have reduced the light reaching the sensor by half by making the aperture smaller i.e. you reduced the exposure by a stop. To make a proper exposure with f/11 as the new aperture, you have to compensate by either using a slower shutter speed of 1/60 sec or by using a higher ISO of 200. Either of them increases the light recorded by the sensor by a stop thereby making the same exposure again. Now, let’s look at the table from before.
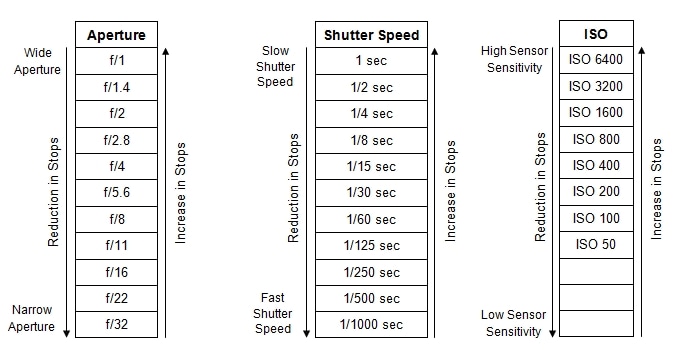
Adjacent values in each of the three tables are separated by a stop of light
As you move up in each of the rows, you are increasing the exposure by one stop each time. Similarly, by moving down, you are reducing the exposure by one stop each time. Take a look at how each setting is affected as you move up or down.
Aperture – As you move up the row by one step, you are opening up the ‘hole’ to allow double the light to enter the camera, which is to say, the exposure increases by one stop. By using the next smaller aperture (or higher f/number), you reduce the light reaching the sensor by half thereby reducing the exposure by a stop.
Shutter Speed – As you move up the row by one step, you keep the sensor exposed to light for double the duration, effectively increasing the exposure by a stop. Likewise, by using the next faster shutter speed, the sensor remains exposed for half the amount of time thereby reducing the exposure by a stop.
ISO – As you move up the row by one step, you are making the sensor doubly sensitive towards light. That is to say, you are increasing the exposure by one stop. In the same way, by using the next lower ISO value, the sensor becomes half as sensitive to light as before, which means you have reduced the exposure by a stop.
The Rule of Equivalent Exposure
To be honest, now you can almost guess what this rule is. It tells you that you can obtain the same exposure at various different settings for aperture, shutter speed and ISO. It is best explained with an example.
Consider an outdoor scene where you are photographing portraits. You choose to shoot in Manual Mode. You look through the viewfinder, compose a frame and half press the shutter release button to meter the scene. You dial in some settings – say f/2.8, 1/250 s, and ISO 200 – to get the exposure level indicator at 0 (which means a ‘correct’ exposure based on your metering mode). You capture a photo but feel that you need a wider depth of field which you know can be obtained by using a smaller aperture. You choose f/5.6, which is two stops slower than f/2.8. To get the same exposure, you can choose any of the following settings as all of the following are equivalent exposures to f/2.8, 1/250 sec and ISO 200. The equivalent exposures are obtained by balancing any increase or reduction in stops by making the opposite changes to keep the overall level of light the same.
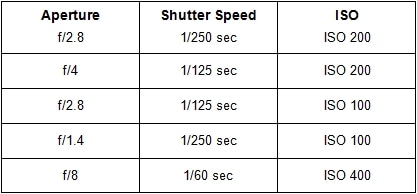
Equivalent exposures for the original settings – f/2.8, 1/250 sec, ISO 200
There can be many combinations to obtain an equivalent exposure, so the above list is only representative and definitely not exhaustive. The photographs obtained with any of the settings above will have the same equivalent exposure, i.e. they will look equally bright. The difference will either lie in their depth of field (due to different apertures), their capturing of motion (due to different shutter speeds), or the noise present in the image (due to different ISO settings). All you need to do to obtain the equivalent exposure is to balance the reduction in stops with increase in stops.
