
|
1. Marquee Selection Tool (M)
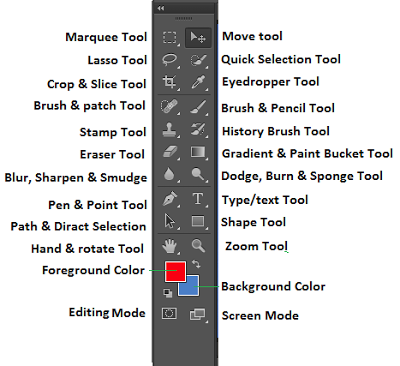
This tool allows the user to select rectangular shaped areas within an image. The areas can then be copied or cut and then pasted into new layers. The tool also can become a bounding border for "pouring" color with the Paint Bucket or Gradient tools. Other marquee tools are available by clicking and holding the button. 3. Lasso Selection Tool (L) Use this to draw selections in whatever shape you would like. To close the selection, either click on the beginning point (you’ll see the cursor change when you’re on it), or just double-click. When holding the [Ctrl] key, you’ll see the cursor change, and the next time you click, it will close your selection. 5. Crop & Slice Tool (C) The Crop Tool works similarly to the Rectangular Marquee tool. The difference is when you press the [Enter/Return] key, it crops your image to the size of the box. Any information that was on the outside of the box is now gone. Not permanently, you can still undo. 7. Brush & Patch Tool (J) You can use this tool to repair scratches and specs on images. It works like the Brush tool (see below). You choose your cursor size, then holding the [Alt] key, you select a nice/clean area of your image. Let go of the [Alt] key and paint over the bad area. It basically copies the info from the first area to the second, in the form of the Brush tool. Only, at the end, it averages the information, so it blends. 9. Clone Stamp Tool (S) This is very similar to the Healing Brush Tool. You use it the exact same way, except this tool doesn’t blend at the end. It’s a direct copy of the information from the first selected area to the second. 11. Eraser Tool (E) This is the anti-Brush tool. The eraser tool is pretty self-explanatory. It will erase whatever you want from the photo leaving the background color If you’re on a Layer, it will erase the information transparent. If you are on the background layer, it erases with whatever secondary color you have selected. 13. Blur, Sharpen & Smudge Tool The Blur tool blurs hard edges in an image. The Sharpen tool sharpens soft edges in an image. The Smudge tool smudges data in an image. 15. Pen & Point Tool The standard Pen tool draws with the greatest precision; the Freeform Pen tool draws paths as if you were drawing with pencil on paper, and the magnetic pen option lets you draw a path that snaps to the edges of defined areas in your image. You can use the pen tools in conjunction with the shape tools to create complex shapes. 17. Path & Direct Selection Tool If you can see the points, you can click them with the Direct Selection tool to select them. Shift-click to select multiple points. Select the Direct Selection tool and drag a boundary around the anchor points. Shift-drag around additional anchor points to select them. You can select anchor points from selected or unselected paths. Move the Direct Selection tool over the anchor point until the pointer displays a hollow square for unselected and filled square for selected paths in a magnified state, and then click the anchor point. Shift-click additional anchor points to select them. 19. Hand Tool (T) It’s for moving your entire image within a window. So if you’re zoomed in and your image area is larger than the window, you can use the Hand Tool to navigate around your image. Just click and drag. You can get to this tool at any time when using any other tool by pressing and holding the [Spacebar]. |
2. Move Tool (V)
The Move tool is used to move selected layers around. Clicking and holding the mouse button can adjust the positions of layer elements. This tool is also used to set and move Guide Lines. 4. Selection Brush: The selection brush allows you to “paint” the pixels that you wish to select. 6. Eyedropper Tool (I) This tool works by changing your foreground color to whatever color you click on. Holding the [Alt] key will change your background color. 8. Brush & Pencil Tool (B) It allows you to make a thinner line in any color you choose. It paints on your image, in whatever color you have selected, and whatever size you have selected. 10. The History Brush tool Paints a copy of the selected state or snapshot into the current image window. 12. Gradient Tool (G) You can use this to make a gradation of colors. It creates a blending of your foreground color and background color when you click and drag it. 14. Dodge, Burn & Sponge Tool (O) Dodge is used to lighten whatever area you use it on, as long as it is not absolute black. Absolute black won’t lighten. Burn is used to darken areas in the image, as long as it is not absolute white. Sponge is used to change the color or saturation of an area. 16. Type Tool (T) It makes type or text. You can click a single point, and start typing right away. Or you can click and drag to make a bounding box of where your text/type goes. 18. Shape/Rectangle Tool (U) By default it draws a Shape Layer in the form of a rectangle. It fills the rectangle with whatever foreground color you have selected. 20. Zoom Tool (Z) It allows you to zoom into your image. Hold the [Alt] key to zoom out. Holding the [Shift] key will zoom all of the windows you have open at the same time. Double-click on the Zoom Tool in the palette to go back to 100% view. 21. Foreground/ Background Color These are your color boxes, foreground (in the front) and background (in the back). Click on either one to bring up the color select dialog box. 22. Editing Mode Quick Mask editing allows edits to be made to only specific parts of an image. These specific parts are painted on by the brush tool (will be shown as red paint), when you click out of editing mode, you will see the "painted areas" as selections. |
Keyboard Shortcuts allow you to quickly and easily initiate commands need when working in Adobe Photoshop, some of the more common ones include the following:
command C - Copy
command V - Paste
command D - Deselect
command X - Cut
command Z - Undo last action
command A - Select All
command S - Save
command + - Zoom in
command - - Zoom out
command C - Copy
command V - Paste
command D - Deselect
command X - Cut
command Z - Undo last action
command A - Select All
command S - Save
command + - Zoom in
command - - Zoom out
