
Pinhole Photography
What is pinhole photography?
Well it could be considered the simplest form of taking a picture (or recording image onto a light sensitive material by exposing it to light). Sir David Brewster was one of the first to capture an image using pinhole techniques. He also coined the term "pinhole".
Essentially it's taking a box, poking a hole into the box with a pin then covering it so no light gets in until you're ready. Then putting a light sensitive material such as film or photo paper (for us photo paper) inside the box. Once the box is placed with the hole facing the subject desired to shoot, you life the covering allowing light to pass through the pinhole. The light then reflects the scene in front of the box onto the photo paper inside the box.
Based on the video, essentially what is a pinhole camera like? .........
When the light passes through the hole and records onto the paper, the image will record UPSIDE DOWN & NEGATIVE.
Characteristics of Pinhole are endless depth of field, long exposure times, infinite camera possibilities.
Building a Pinhole Camera:
You will need:
You will need:
- A box of some kind. This can be any kind of box that you can close tightly so no light can get in. Different size and shape boxes will produce different results. (good things to use are: coffee container, oatmeal container, small shoe box, craisin box, or any other kind of box/container.) YOU MUST BRING THIS IN!
- Black paint & paint brush (we have this in class)
- A needle (we have this in class)
- Cardboard Shutter (we have this in class)
- Black Duct Tape (we have this in class)
Shooting with a pinhole camera:
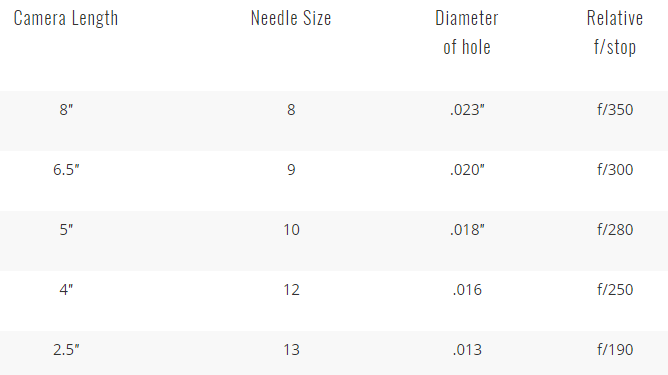
We will use the following chart to determine exposure times. First we need to know your aperture. This chart gives approximate F-Stop. We will measure your container then poke a hole the appropriate size to result in the appropriate f-stop.
- Once the camera is made we will go into the darkroom and load the camera with ONE piece of photographic paper.
- MAKE SURE THE CAMERA IS SEALED SHUT AND THE PINHOLE IS COVERED BEFORE LEAVING THE DARKROOM!!
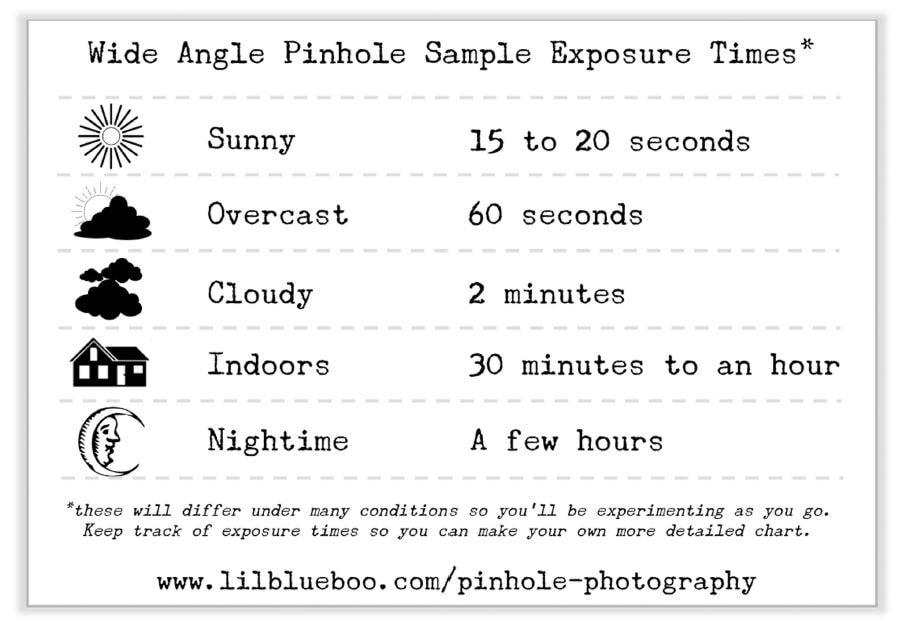
- Then we will go outside and expose the paper by lifting the flap over the pinhole. Depending on how bright it is outside, the exposure time may vary. Some may come out a bit dark and some may come out a bit light.
- The key is to keep the camera as still as possible while exposing. This means it should be sitting on something sturdy.
- Once the exposure is done cover the pinhole again. DO NOT UNCOVER UNTIL YOU ARE BACK IN THE DARKROOM!
- Once in the darkroom take the paper out and run it through the chemical process for developing paper. You will notice the image appears as a negative.
We will use the following chart to determine exposure times. First we need to know your aperture. This chart gives approximate F-Stop. We will measure your container then poke a hole the appropriate size to result in the appropriate f-stop.
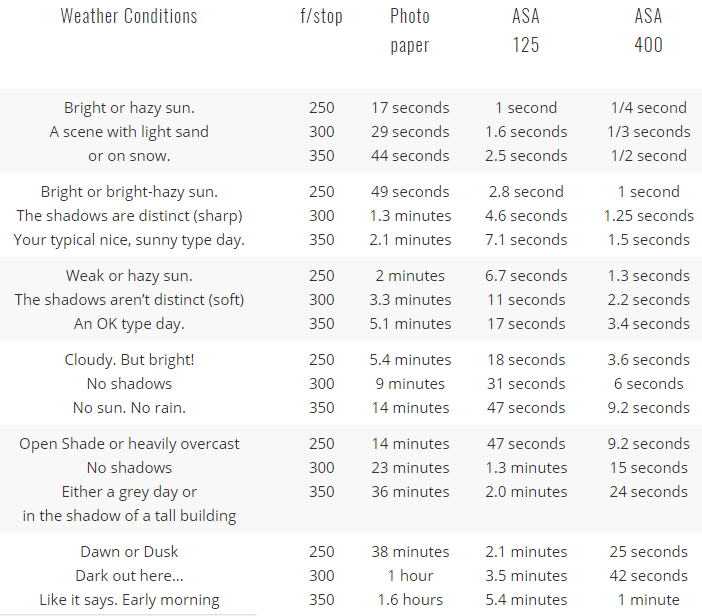
Based on the F-stop determined use the chart below for approximate exposure time. Remember this is approximate. You may need the trial & error method. WRITE DOWN your exposure time. That way if it is over or under exposed you know how to compensate.
Assignment:
We will follow the steps above to make a pinhole camera and use it to expose an image. You will turn in your negative. We will look at them all together in class to see the difference in exposure times. MAKE SURE YOU WRITE DOWN YOUR EXPOSURE TIME when you exposed the paper in the camera, as well as how long you exposed the negative to positive print in the darkroom. This is very tricky to get the exposure just right. If yours is too light or too dark don't get discouraged.
Rubric:
20 - Construction of Pinhole
20 - Use of class time wisely / followed instructions
20 - Labeled Camera correctly
40 - Pinhole Image
10- Creativity
10- Exposed Properly
10- Developed Properly
10- Composition
